|
This page updated Best
|
|
|
|
|
A visitor to my website wrote to ask why I didn't have some information on what glass (lenses) I used and liked. I told him that I didn't have much to say because virtually all of my wildlife images were taken with two lenses -- the Canon 100-400 L series zoom, and the Canon 300 f/2.8. Most of the work I do requires being able to move around. In fact, I love stalking wildlife. I know, I know, most wildlife photographers shoot from the roadside, and use 500mm or longer lenses on tripods. That's fine. I just don't like to do that. And I shoot a lot of birds on the wing. Even with a gimbal mount, nailing birds on the wing from a tripod is damn hard. Hence my preference for a lens I can hand-hold. Over the years I've either owned, rented, or borrowed other telephoto lenses than the 100-400 and the 300 f/2.8, but these are the two I use for the vast majority of my work. Why did I settle on these two lenses? Well, if you read what I do like about them, and what I don't like about the others I've tried, you'll understand. Here's my take on all these lenses. Please take what I have to say with a grain of salt, though. If you don't mind using a tripod, or don't carry your equipment very far, some of what I've to say isn't applicable.
This lens has a bad-reputation in some circles, and frankly, I can't understand why. Common complaints are that it is heavy (heavy! compared to what?!!); that the maximum apertures are too slow; that the push-pull design is awkward; and that the lens doesn't produce sharp images. I guess heaviness is in the hand of the beholder, but at 3.1 pounds, this lens can easily be carried all day long, and is a dream to hand hold. In fact, it might even be steadier if it were a bit heavier! This is my favorite lens for stalking wildlife. In it's collapsed position, it is only a bit over seven inches long (about 10 with the lens hood). This is a "push-pull" design, which means that to extend the zoom you lengthen the lens (or shorten it) by sliding the outer barrel over the inner one -- like a slide trombone. The alternative is usually a lens that you twist. Critics of this lens don't like the push-pull design, but believe me, it is much faster than rotating a lens barrel, and I've often tracking incoming birds, shooting and shortening at the same time as they drew nearer. It is an excellent design as far as I'm concerned. The maximum apertures at focal lengths in this lens are a bit slow, I admit. If I still shot film, I'd really complain, since most of us used to shoot film with only a 100 ISO (200 was considered the max for good results). But with the higher ISO's available on today's digital cameras, an f/5.6 lens isn't much of a problem. To achieve a fast shutter speed, you can compensate by increasing the ISO speed. Finally, some don't consider this lens as one of Canon's sharpest. Well, all I know is that for me, using cameras with a 1.6 crop factor, this lens produces stunning results. Here's a shot of a Great Gray owl about to ruin a mouse's day. Look closely at his talons. This shot was taken at the lens's full 400mm extension (at 800 ISO, by the way, yielding a shutter speed of 1/1000th of a second). If that's not sharp enough for you, then I'm not quite sure what to say. It certainly has been sharp enough for the photo editors who've purchased this image, or for those who've bought prints of it to decorate their homes. And remember, the images you view on my site (or anywhere on the internet for that matter) are reduced in size and quality to speed up download. If they look sharp here, you can believe the originals are stunning. At about $1500 U.S. dollars, I consider this lens a bargain. And if you've read this far, I guess you already know that I think this is a great lens! If you'd like to try this lens before buying, I'd suggest you rent it from the great people at iRentPhoto.com.
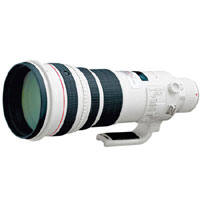
Canon 300mm f/2.8 IS USM Prime Could this be the best telephoto lens ever made? If there was a camera lens hall of fame, I'm sure that just about every shooter that has ever used or owned this lens would nominate it for inclusion. It is that good. (NOTE -- CANON HAS REPLACED THIS LENS WITH A MKII VERSION -- YOU CAN READ A COMPARISON OF THE TWO HERE.) When you see all those white lenses on the sidelines of sporting events, most of them will be the 300 f/2.8. It is known as the sport shooter's lens. It is incredibly sharp, and incredibly fast focusing. Although Canon has improved image stabilization since this lens came out with it (there are still some non-IS versions floating around used out there), the version in this lens is excellent -- by far the best that I've used. It also has three settings to its focus limiter, which means that you can set this lens focus faster than you can believe. If you can't get a sharp action photo using this lens, you should take up painting watercolors. But isn't 300mm a bit short for wildlife work? Yes indeed. I always recommend to new shooters that they will need a telephoto lens of at least 400mm to do wildlife photography. But....and here's the real cool thing about this lens...the 300mm f/2.8 functions flawlessly with the 1.4x tele-extender. I mean flawlessly! Autofocus is barely affected, and the image quality is incredible. I don't often recommend using tele-extenders because they can so adversely affect image quality, but it simply isn't a worry with this lens. Married to the 1.4x extender, this lens becomes a 420mm f/4 lens. It gets even better. This lens also performs extremely well with the 2x extender, which in my experience is a rarity. Most lenses deliver unacceptably (read that as "unsalable") images when coupled to a 2x, but not this lens. Yes, you do have to open it up a bit (I like to shoot this combo at f/8 if the light allows), but even wide open (this lens becomes a 600mm f/5.6 with the 2x extender) it yields many usable images. In size and weight (six pounds), this lens is still quite hand-holdable, although at 600mm, you'll probably want to brace it against something, or use a tripod or monopod. When using it as a 420mm lens, I frequently hand-hold it, or, more often, put it on my BushHawk. At 600mm, I tend to mount it on my favorite gimbal mount, the Induro GHB1 Gimbal Head. At $4500.00 USD this lens isn't cheap. But it is worth every penny if you are a pro. I still use the 100-400 for my walking around lens in the woods, because the flexibility of its zoom is unbeatable. However, the 300 f/2.8 with extenders is also very versatile. If you're looking for an extremely fast focusing, relatively light weight and portable, 400+mm lens, you could absolutely do no better than this lens and extender. In my estimation, it is a FAR, FAR better choice than the next lens in this review, the Canon 400mm DO.
Canon EF 400mm f/4 DO (Diffractive Optics) lens I really, really wanted to like this lens. Really. At 4.3 pounds, and only 9 inches long (without the lens hood), it's f/4 speed makes it possible to use a 1.4x tele-extender and retain quite excellent autofocus speed, yielding a 560mm hand holdable lens! Canon's Diffractive Optics technology is designed to decrease lens size and weight while supposedly producing results comparable with traditional lens design. Lenses of this design have been received with mixed results. You will read lots of reviews out there if you are considering this lens, and some will say that the older versions produced soft images, and the new versions don't -- that Canon fixed it. Well, I'm here to tell you that this just ain't so. I've now used three copies of this lens, and I could get NONE of them to produce the kind of images I'm used to getting with the lowly 100-400. And that's with and without and extender. In fact, in head to head comparisons I shot with this lens and the 100-400, at the same shutter speeds, aperture, and ISO, the 100-400 gave me images that were much sharper. It's not that the images were blurry. It's just that they lacked that "wow" factor when examined on the computer. On a really good image, you ought to be able to zoom in nearly to the 100% size and still be pleased with the image sharpness. Images shot with this lens, though, lost their pleasing sharpness at about 50-70%. The number of "keepers" I got -- images I'd feel comfortable sending to the editors I work with -- just wasn't high enough to warrant the price of this lens. Considering this lens costs in excess of $5500.00 USD, it really ought to blow you away with its performance in image quality. Yes, it is white, and so fits into the Canon "L" series of pro lenses. But no matter its color, it does not yield images on par with any other "L" lens. Not by a long shot. At one time, Canon seemed poised to use this Diffractive Optics technology in lots of lenses....the fact that they've only released two, and those now both almost a decade old, seems to indicate that even they recognize the shortcomings of this technology. Time will tell if it can be improved upon so that they produce the kind of results that are required for professional work.
Canon EF 500 f/4 lens This is a favorite lens of just about every Canon wildlife shooter I know. It is their work-horse lens, and they love it. (NOTE: CANON HAS REPLACED THIS LENS WITH THE MKII VERSION, WHICH IS LIGHTER, AND, I'M TOLD, SHARPER AND FASTER FOCUSING.) With a reputation as being one of Canon's sharpest lenses, and with excellent autofocus speed, its popularity as a great wildlife lens is well deserve. Since it is an f/4 lens, it also works very well with the Canon 1.4x tele-extender, yielding a 700mm f/5.6 lens, which is still fast enough for bad lighting conditions. For me, the biggest drawback to this lens is its lack of portability. Even though it has image stabilization, you'd need to be an NFL lineman to hand-hold this lens for very long. This marvelous lens is 15 inches long, and weighs in at 8 pounds. However, on a BushHawk, this lens does become portable, although most shooters tend to mount it on a tripod, and, if shooting birds, use a gimbal mount. This is a rugged, dependable lens, that produces great images. When shooting from or near a vehicle, this is a great bird and wildlife lens. If you have any distance to hike, however, this lens is quite a load. I can't say too much good about the image quality this lens delivers. It is simply phenomenal, though I will say that it may not be quite as sharp as the 300 f/2.8. Having said that, I have shot many stunning images with this lens, and I tend to use it extensively with the 1.4x multiplier. Given the choice of the 300 f/2.8 and 1.4x multiplier (420mm f/4) and this lens (500mm f/4), I tend to grab the 300 and 1.4x. It is FAR lighter, a tad sharper, and a whole lot more portable. When on an extensive photo safari and shooting from a vehicle, though, I like to have a 1.4x on both lenses. That gives me a 700mm f/5.6, and a 420mm f/4. The 500mm lens, even with the 1.4x extender on it, focuses acceptably fast enough to capture birds in flight, though it isn't ideal for this. This is one of Canon's most expensive lenses. If you can't afford to buy it, consider renting it. There are several places online through which you can rent this lens.
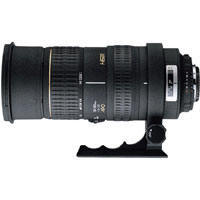
An affordable lens (often available on-line for well under $1000), I've tested this lens (actually owned two copies) many times. While the incredible zoom range is very useful, the image quality is less than stellar. Weight and size of this lens is about on par with the Canon 100-400 (it is a pound heavier), and I found it to be very well built. In some ways, I regret having sold it as this is a truly useful zoom range, and for those of you considering a good amateur starter wildlife lens, and you don't mind tripods, this might be an excellent lens to acquire. Although some might consider the apertures too slow (f/4-6.3), they are on par with the 100-400 Canon. Optically, this lens falls short of the "L" series lenses from Canon, especially at the 500mm end. It does perform better if shot at f/8 or more. Yes, I've taken saleable photos with it, but the yield of keepers to "soft" images is too high. This lens is built very sturdily. Since it still doesn't have image stabilization, I mounted this lens on a BushHawk shoulder mounted camera "gunstock" which works well, as does a monopod. In addition to image quality, the lens still has a couple other drawbacks. First, as mentioned, it could really benefit from image stabilization. When Sigma first developed this lens, they did not have that technology. Now they do. Perhaps someday we'll see it on the 50-500. It really could also really use a focus limiting feature, as found on most Canon "L" series lenses. Without it, it can easily hunt from front to back before locking on a subject. Don't get me wrong, the autofocus is good -- on par with the Canon 100-400 -- but if you're pre-focused on something near, and try to quickly lock onto something far away, it takes more time to respond than it would with a focus limiting feature. You can work around this by trying to maintain a "pre-focus" area, but that's not always possible, nor do I always remember to do so. While I've read others have had good luck using a 1.4x teleconverter with this lens, I find it to be awfully slow focusing combination. Image quality is OK, but don't plan on shooting fast moving subjects.
I have a full review of this lens, comparing it to the Canon 100-400, here, so I won't go into too much detail. Suffice it to say that, like the Sigma 50-500 above, I found the image quality yielded by this lens to be lacking when shot wide open and at 500mm. It performs quite well up to 400mm, even on par with the Canon 100-400 (although it is a full F-stop slower at 400mm), but at 500mm, you simply must shoot it at f/8. That's a huge drawback. Unlike the 50-500, this lens has image stabilization, which, although sort of noisy, works very well. It suffers from a lack of a focus limiter, forcing the lens to hunt it's entire focal length.
To read more
about this lens, and see sample photos, please follow this
LINK.
|
|
|
|
||
|
|
You know how it works -- you download your images with their non-descriptive file name, then have to rename them or suffer with the endless parade of nearly identical file names forever. A confusing mess. Renaming after downloading isn't that big a deal. Photoshop offers an awkward way to do it, as do most image editors. But it is yet another step that takes time. What if those files could be renamed for you while downloading? Wouldn't having one less step in your workflow make life easier? Absolutely! Enter Downloader Pro from Breeze Systems, an absolutely must-have program for any digital photographer. Not only does this little program rename your files per your instructions (the number of ways you can rename your files is nearly endless -- you can rename them by date, by location, by subject, etc.), add IPTC caption information, it will create a directory for them, automatically losslessly rotate any vertical images, append a color space to the image (such as aRGB, if shot in that mode), set the ppi to whatever you wish, geo-tag them, and then open, with the click of the "custom" button, whatever browser, photo editing program, or directory you specify. If that weren't enough, the program verifies that the images were indeed downloaded properly, then allows you to delete the images, thus erasing the card for its next use. It can even download to two directories at once, so that you have mirrored folders, each with identical contents in case you're truly paranoid about accidentally deleting an image! And it also supports the use of external hard portable hard drives (such as ImageTank) taken afield on which images are stored. I've used this program for years now, and have upgraded each time a new version comes out. I can't imagine not having it. I retained the same image "filing" system I used when I shot slide film. Each topic matter had its own unique prefix so that I could, just by looking at the slide prefix, know whether it was a mountain landscape or a bull moose. For instance, in my parlance, a photo of a mallard duck would be BWDM_1234.jpg. (Birds, Waterfowl, Ducks, Mallards.) Having some way of giving you a clue as to what an image contains simply by looking at the file name is a huge advantage, even for family photos (Xmas2004.jpg is a LOT more helpful than DSCN_4567.jpg!!!). Now obviously, if you have several subjects on one card, you'll not want to name them all the same way. That's fine. You can view the images as thumbnails, select all of one subject, download, rename, and caption just those files, then return and select the next subject and do the same. This powerful little program is an immense saver of time for anyone who shoots a lot of images. I recommend this program to everyone. It is inexpensive ($29), works flawlessly, and truly makes digital imaging easier. I wish every computer program out there lived up to its claims as well as Downloader Pro does. You can download a trial version, so you can give it a try, and if you don't like it as much as I do, you're out nothing. Here is a full list of its features:
Breeze Systems has other digital imaging products as well. For instance, their BreezeBrowser Pro is a fabulous image viewing program that I use much more often than Photoshop's Bridge. If you are looking for a substitute for Bridge, I strongly suggest you download the trial version of BreezeBrowser Pro and give it a try. User support for any BreezeSystem product is exceptional. Chris Breeze, the founder and product developer, actually answers emails, and updates and answers questions on the user forum, a breath of fresh air in a day when emails to "support teams" yield only automated responses filled with FAQs that you've already read, and don't solve the problem. I give this Breeze Systems and Downloader Pro a Thumbs Up (I hope Roger Ebert hasn't copyrighted that!).
|
|
|
It will happen someday. You'll go to download a day's shoot, and the buggers just won't come off the card. Who knows why this happens, but it does. Must be Gremlins. I found this program after just such an event. It is absolutely free, works extremely well, and also works to recover corrupted images on a hard drive. Download now while you're thinking about it, then just hope you never have to use it. But if you do, it'll be there to save you some frustration and cursing! The program is called PC Inspector Smart Recovery, and is distributed free by the fine people at Convar, a German company (yes, there is an English version). To download this program, click HERE.
|
||
|
I suspect that like most of you I started making online photo galleries using HTML templates. They worked, but they lacked any pizzazz and were difficult to customize unless you were knowledgeable in HTML. I searched the web for better gallery making programs, but found each and every one lacking some function that I considered important to me. Until I discovered Jalbum, that is. Jalbum is free software that allows you to build galleries virtually any way you like because it is open software that encourages others to create "skins" that operate within Jalbum. There are hundreds and hundreds of skins availalbe, each with its own features. Jalbum even will host your gallery online for free, or you can host the galleries at your own website. The choice is yours. Jalbum utililzes the latest in flash technology so that galleries are imaginative and attractive, and in the few months I've used it, there have been several free updates. I am currently testing various skins, but the one I like the most is FotoPlayer. I think it offers the features that a professional photographer needs better than any other gallery building program on the market. If you've been to my photo galleries, you've probably viewed albums built with Jalbum and the FotoPlayer skin. Since you can download both programs for free (FotoPlayer does require purchase to remove links and enable some features, but the free version is powerful and attractive anyway), why not give them a try? I think you'll be impressed.
|
||
|
A Great "Slide Show" Program --
PicturesToExe
Back in the "old days" you took your Kodak Carousel projector loaded with slides and made your presentation. A great thing about that system is that you could order the slides in any way you wanted, and about the worst thing that could happen during a presentation is that the bulb to the projector would burn out. Those days are largely over. Now we worry whether our laptop, on which our presentation is loaded, will communicate with the digital projector, or if the whole thing will just refuse to cooperate, and we end up doing hand shadow puppets for the hour we've been hired. Sheesh. In making the transitions from real slides to digital "slide" shows, I tried many programs to create my presentations. I found that a great many of the programs out there were either way to cumbersome (Microsoft PowerPoint) for the job, or they were so simple that you couldn't even order the slides according to your wishes. Now PowerPoint is a great program for certain things. But if you really just want to do a digital version of a slide show, it is too much, and too expensive. Sure, you could just use the built in slide show feature of the Windows Viewer or similar slide show features of other programs, such as Adobe Bridge, but the problem is that you can only organize the slides by date, or image name/number, or other similar constraints. During my search for a better slide show program, I stumbled upon PicturesToExe from WnSoft, and have loved it ever since. I really only use it to create simple slide shows, although I occassionally add text to slides with it as well. But it is an immeasurably more powerful program than that. I simply haven't tapped all the features, such as adding music. Here's some of the features as describe at their website:
And that's the beauty of the program. It creates an executable file (hence the term "exe" which is the file extension for programs) that runs without any other software needed. You can load your slide shows on a flash drive, and use the computers available at your destination, and the not worry whether they have any software such as PowerPoint loaded on their computers. The slide show is completely "self contained" so to speak. In addition, the image quality is excellent -- if you're a there to showcase your images, why use a program that degrades image quality? PicturesToExe is simple to use. You can drag and drop your images in any order, add some text, place one image on top of another, control the transitions between slides, even add music or sounds (I sometimes add animal or bird sounds to my slide shows to match the image being presented) with real ease. You can set the images to transition at a fixed rate, or you can over-ride that and have them advance manually (which is the way anyone who is using it for a lecture would want to go). And on top of it all, once I purchased the program, all of the updates have been free. Can't beat that. You can download a trial version for free, so why not give it a try? I find PicturesToExe the best slide show program I've ever used, and would recommend it to anyone who is serious about creating professional looking presentations.
|